How do I adjust the headrest in my Ford vehicle?
Your head restraint (headrest) can be adjusted or removed using the buttons on each side of the guide sleeves. Refer to the image and table below to learn more about how to install, adjust, or remove your head restraint.
Note: Your vehicle may have a different head restraint than the one shown in the example. For information specific to your vehicle, refer to your Owner's Manual.
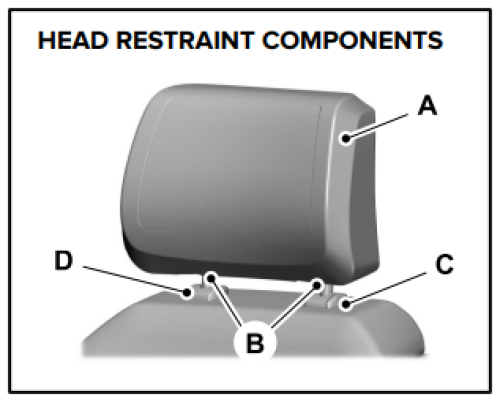 | A - An energy-absorbing head restraint B - Two steel stems C - Guide sleeve adjust and release button D - Guide sleeve unlock and remove button (if equipped) |
| Actions | Instructions |
| Raising the Head Restraint | Pull the head restraint (A) up. Note: Depending on your vehicle model and year, you may have to press and hold the adjust and release (C) button. |
| Lowering the Head Restraint |
|
Removing the Head Restraint Note: You cannot remove head restraints that have audio system speakers. |
|
| Installing the Head Restraint | Align the steel stems (B) on the guide sleeves and push the head restraint (A) down until it locks. |
| Tilting the Head Restraint (if equipped) |
|